How to Make Chokers: Making Necklaces with Inexpensive Ribbons

I love elegance, but I'm on a budget, so aside from a $180 Tiffany's cupcake charm I once fell for in the Hong Kong airport, I've never spent more than $25 on any piece of jewelry in my life. The nice thing is that I have never found myself wanting in the accessories department- there are so many inexpensive alternatives!
While ribbon accessories are very simple, even rudimentary forms of adornment, ribbon necklaces and chokers can be traced back to the most chic of European royalty and aristocracy. From the fabulous French Rococo period to the English Regency era, ribbon chokers have graced the neck of many an elegant dame.
And yet so few women these days take advantage of ribbons! One can occasionally find ribbons being used in a loose necklace form, but rarely do I come across a real, bona-fide choker in any sort of store- beit mainstream or super niche. The sad truth is this: you will be hard pressed to find a quality ribbon choker in any retail store. Those that are available for purchase are typically garish and overdone- not to mention overpriced!
When it comes to ribbon chokers, I recommend taking a different route.
Make Your Own Choker
How convenient it is that we don't actually have to buy these little necklaces- they're so easy to make.
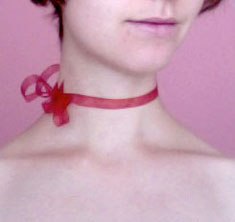
While you do have the option of going to a bead and necklace making store and picking up clasps that you can affix to the ends of your ribbon to make it into a formal necklace or choker, sometimes the best option is to use the ribbon in its most elemental form and tie it to your neck with a simple bow. This type of choker is super low-maintenance; no charm or medallion is needed to hang from the ribbon- the bow is a perfect decoration on its own.
How to Create the Perfect Ribbon Choker
The first step involves picking out a ribbon. Some notes on that:
- You can either order small spools of ribbon online or visit a craft, fabric, or gift wrap store and purchase ribbon by the foot or yard.
- When selecting ribbons, keep note of the weave as you'll want something that doesn't fray when you cut it.
- Also pay attention to ribbon thickness- this will come into play when you try to tie the ribbon around your neck- thick ribbons don't tie very well.
- Take heed of the ribbon's texture- this will affect how well it ties. Certain ribbons are so slick or grainy that they don't hold bows very well. This will be troublesome if you plan on simply tying your choker around your neck.
- Consider the feel of the ribbon- after all, you'll be wearing them around your neck, which can have rather sensitive skin. You don't want something that will chafe or itch.
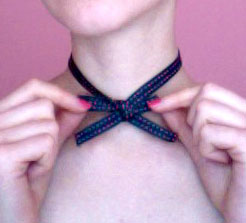
Next, you'll need to cut your ribbon into appropriate lengths.
- I recommend taking an inexpensive test ribbon and cutting out a long length, tying that in a bow around your neck, and then cutting the ends of the bow to desired lengths. The resulting segment will be the perfect length for a choker for your neck.
- This test ribbon can be used as a template- simply use it as a measuring tape when cutting more expensive ribbons, or when making new necklaces.
- Keep in mind that everyone has differently-sized necks. If you want to make cute chokers for your friends, you would benefit form measuring each of their necks individually- or making their chokers slightly larger than usual so they can trim off the ends as needed.
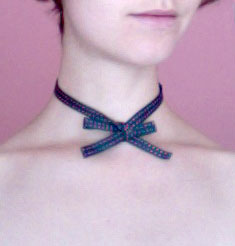
Now, it's time to take your choker for a spin!
- Just tie it around your neck. Do you love how easy that is? Yeah, I do too. Being lazy is fun.

Some Notes on Embellishments
Ribbon chokers are exquisite in their simplicity, but that doesn't mean you can't have some fun with them. Ways in which you can embellish this classic adornment involve (among other things):
- Adding pendants, charms, or beads for extra personalization
- Tying multiple ribbons to your neck at once for a more complex look
- Braiding several ribbons together to create a woven choker
- Creating varied sizes and types of bows
- Utilizing ribbons that incorporate lace and other built-in embellishments
Have fun!


