How to Make Your Own Podcast Using GarageBand
GarageBand is perfectly good podcast software that comes free with Mac computers. It is very user-friendly, and when I first started using it, I thought I would need no extra help getting started, but after getting some great tips on podcasting from a real pro, I found that there are some not-so-obvious things to consider when getting started.
I've compiled my GarageBand notes below, and hope you find them helpful!
Creating a New Project
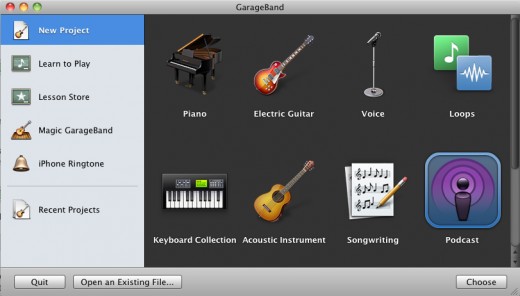
To get started, open GarageBand, and create a new project.
- Choose Podcast as the format, unless you plan to produce a podcast that is more like a music radio show or want to build up your own custom podcast settings, in which case you should choose "voice."
- Give your new project a name, and decide where you want it to be saved (I always save things to my desktop so I can easily find things and then file them away when I'm finished with them). No need to worry about the other settings.
- Click the "Create" button. You will now be taken to the main window of your new project.
Customizing Settings
The first thing you'll want to do is to create a custom voice setting, then change your mic settings.
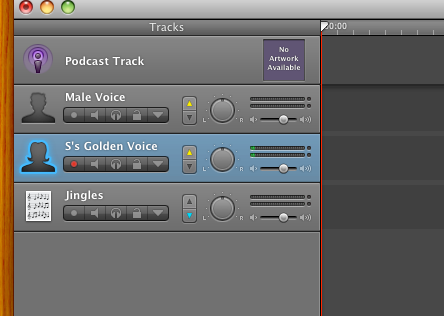
- Double click on either Male Voice or Female Voice (I suggest going with your gender)
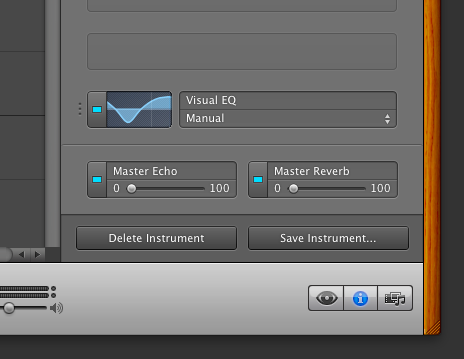
- You'll see settings for that "Instrument" profile to the right of the window. Click on the "Edit" tab.
- Make sure that echo is turned all the way down and that Master Reverb is no higher than 7%. Click "Save Instrument" and give it a special name.
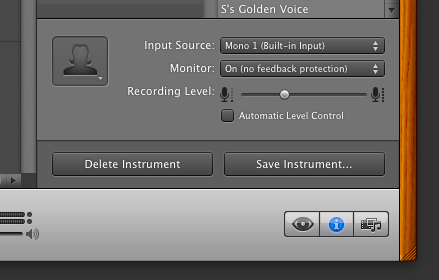
- Now, click on the "Browse" tab.
- Set the input source to Mono 1 and set the monitor to on, but with no feedback protection (these specific tips came from the podcasting expert I consulted, and I can't remember why he recommended doing this, so feel free to leave the monitor off!). You can also regulate your recording level here, so feel free to do so if you feel that you need to quiet for voice or bring the volume up.
One more note: You might want to turn off snap to grid (by going to the Control dropdown menu or hitting command C) to prevent your dragging and dropping from veering toward quarter tones.
Hurray! Now you're ready to add your voice, music, and images!
Adding Your Voice
Recording on GarageBand is as simple as can be!
- Make sure your microphone is hooked up. If you have a USB microphone, you'll just have to make sure it's plugged in!
- Select your custom audio track
- Hit the red record button at the bottom center(ish) of the page to start recording, hit it again to stop!
Adding Music
Some intro/outro music, plus an image for your podcast, make for excellent finishing touches, and I recommend them including them in any podcast. Here is how to add music:
- Go to the Media Browser by clicking on the media icon at the bottom right of the window.
- The Audio tab at the top of the media browser will be open by default; from here you can select playlists from your iTunes library and add songs from there.
- To add songs or other sounds to your podcast, simply drag the file of note into the jingles section of the center part of the window. You can the song around by dragging and dropping.
- If you want to be able to add multiple songs to your podcast and fade in and out, add another audio layer by hitting shift, command, N to create a new "No Effects" track. The podcasting expert I consulted actually recommended deleting the Jingles track and just adding music to a new No Effects track, so if you want to have no special presets for the track to which you add music and the like, just do that.
Adding Images (and Chapters / Podcast Markers)
Adding images is as simple as can be! Chapters complicate the matter a bit. But here is the gist:
- Click on the "Photos" section of your Media Browser. It is set to pull photos form iPhoto, but you can also search for Photo Albums. You can drag photos from that bar straight into your podcast, but you can also import images by simply dragging the files to the same spot straight from your desktop.
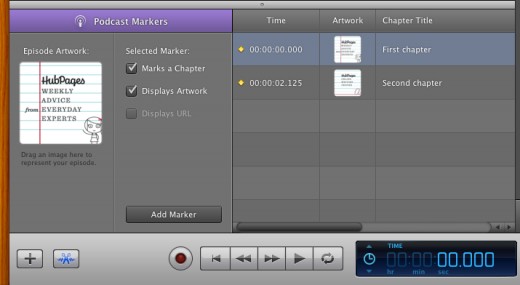
- There are two places where you can insert photos into a podcast- the Episode Artwork window at the bottom left of the window, or the Podcast Track bar at the top center of the window. If you want to simply add a generic logo to your podcast episode, drag your square image to the Episode Artwork box.
- If you want to break your podcast episode into chapters, you can also associate an image with each chapter. You can do so by manually dragging an image into the Podcast Track bar of the center of the screen (which creates the chapter), then adjusting the length of the image/capter or by simply clicking "Add Marker" at the head of a track you have recorded where you want your chapter to begin and subsequently adding the artwork to the little marker list that builds up at the center bottom of your window. If you do not add artwork to a specific chapter, it will just show the default image you have set as episode artwork.
If chapters confuse you and you don't want to take the time create multi-chapter podcasts, simply make it all one thing with one piece of episode artwork.
Adding Metadata
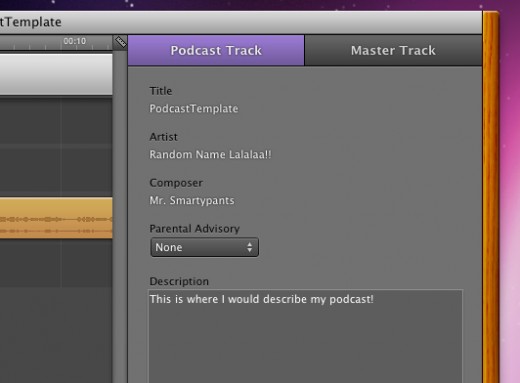
Adding a description and other metadata to podcasts in GarageBand is the one non-intuitive thing that I was really happy to be told about - because I probably would not have figured it out on my own otherwise!
- Click on the Podcast Track bar at the top left corner of the screen to highlight
- Click on the "i" at the bottom right corner of the screen in case that track info tab was collapsed
- Add and edit your podcast title, artist and composer names, parental advisory setting, and description as needed.
- Under the GarageBand dropdown menu, click "Preferences"
- Click My Info (the human silhouette)
- You can edit the default iTunes Playlist, artist, composer, and album names here.
- The Official Apple Garageband Guide
If you want more detailed information on GarageBand or want to find tips on how to use specific parts of the software, check out these official guidelines.
Exporting
Once you have finished creating your podcast, all you have to do is go to the Share dropdown menu and select what you want to do next!
If you want to test your file before uploading it, select "Export Podcast to Disk" and listen to the resulting mp4 in iTunes before forging forth.
More Podcasting Tips
- The Top Podcast Microphones: How to Pick a USB Microphone (or Condenser Microphone) to Make a Podcas
If you are just getting started in the podcasting world - or would like to buy a new microphone - you will be overwhelmed by all of the choices. I sure was when I got started with podcast production! To make... - How to Build a Portable Sound Booth for Podcasting
If you plan to record a podcast from some place that is not a studio, or if you are dealing with a relatively low cost microphone (e.g. under $300), chances are that the microphone will be picking up a bunch... - Make Your Own Podcast Guide: From Podcast Equipment to the Upload Podcast Process
Have you always wanted to create your own history podcasts or educational podcasts? Or to share your expertise with a larger audience? Podcasts enable you to have your own sort of online radio show that...

